Making a Modern Vector Graphics Game
by Michael Klaus Schmidt
Update: I have added a section for using GL Lines in C# for folks who use Unity.
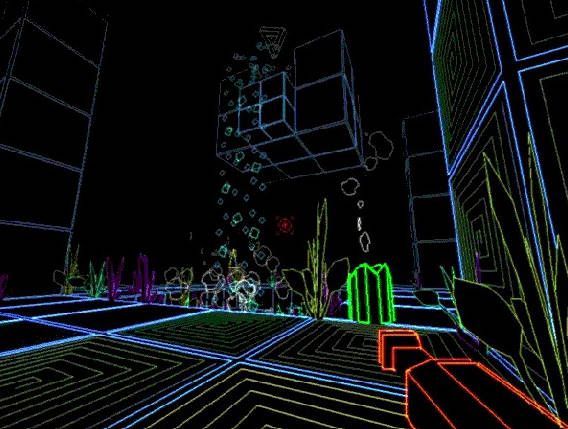
For many years, pixel graphics have been the style of choice for many games. From the earliest days ofvideo games, large pixels were the format of choice (and necessity) for many games, and this style has worked its way into the psyche of many players. When “retro” video games became a thing of importance, it was natural that they would choose to use large pixels for their graphic assets and art.Most game engines have ready made systems to use 2D sprites, and making games “pixel perfect” is nolonger as difficult as it once was. This makes it a perfect choice for smaller scale developers and studios who do not have the time or budget to make high resolution, realistic models.

However, there is another completely different graphic style, that may actually pre-date pixel graphics, that has gone largely unacknowledged in recent years. Vector Graphics games like Battlezone, Asteroids, Tempest, Tailgunner and even the very first Star Wars game used to dominate the arcades in the early 1980's. In fact, these games were the precursors to modern 3D games, using vectors to draw lines in a virtual 3D space.
So, for me, it seems natural that this style would also make a comeback. However, unlike 2D sprites, most game engines do not have a ready-made method of producing vector images. This is a problem, because without this kind of easy access, the trend, and potential swarm of new games, will be stunted before it gets a chance to take off and reach its full potential.
So I have come up with a method of producing vector graphics in a modern game engine. Now, before I begin explaining how to approach this, I first would like to say that there are probably other, equally valid, potentially better ways to do this. This is the method I used, but that should not limit anyone from exploring their own preferred way of doing things.
Second, I am not using one of the more popular game engines, so while my overall approach should work regardless of the engine used, the specific scripts I'm using will not.
Note: This method describes how to make vector games for standard graphics displays. This is not the same way vector games were created originally, which used oscilloscopes, or other specific pieces of graphic hardware, to generate true vector graphics.
3D Models
To generate vector graphics on screen, we really need to focus on two main points. The first is the 3D models. Originally, vector games probably did not have “models” in the modern sense, and objects would have been generated through some kind of script. This is just speculation though, as I never learned how vector games were made in the early days of game development.
For modern engines, we generally use models to render 3D objects, and I thought this would be the bestway to do it. However, our models will need to be created in a way that is different from those of most games. The main difference is that we do not use textures to render the model/mesh. I actually do use a texture, but it is solid black, and therefore cannot really be seen in-game.
So, I start by making a low-poly model of my game object, just as is done in any game. In theory, the models do not need to be low poly. I really think there could be some very unique things one could do with higher resolution models done in vectors, since that is something I've never seen before, but for now, and for the sake of simplicity, we will stick with low poly models.
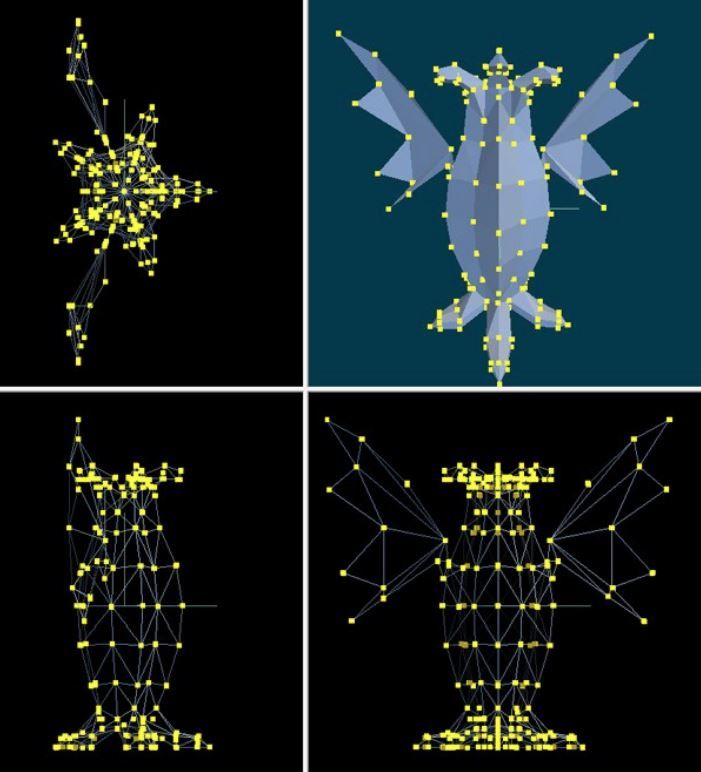
Once the model is done, I have to think about how I want to draw it. Since the model will not be visible, being solid black against a black background, I have to think about where each vector will be located and how it should connect to other vectors, i.e. where the lines will be drawn.
Why not just use the existing vectors in the model you ask? Well, the way I am rendering these models,it will connect each vector to the vector that was made right after it, in my game engine (3D GameStudio) vectors are numbered. So, in order to render correctly, each vector has to be produced in the order in which the lines will be drawn. Also, if the vector is also used to make a face for the model, if that face is solid (occluding shapes drawn behind it) then it will also occlude the lines being drawn, and they may appear imperfect.
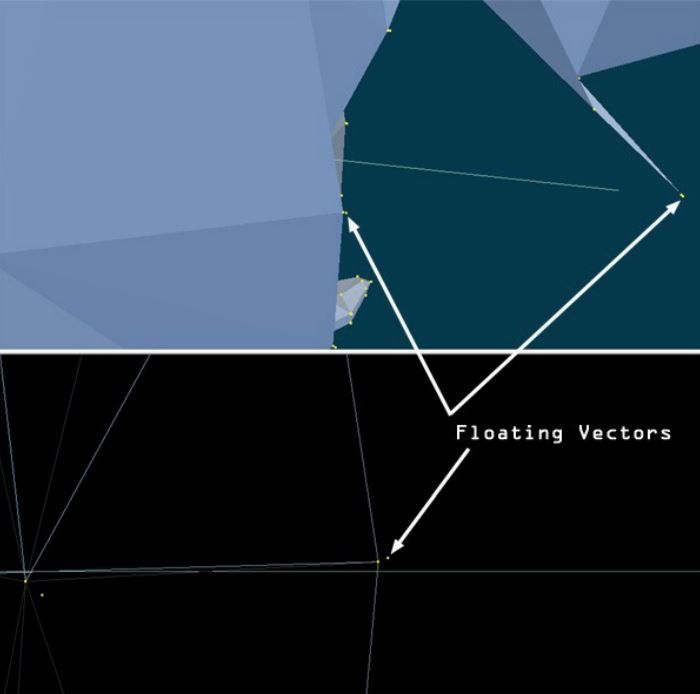
So, to avoid these problems, I came up with the following method. Starting with my basic model, I thenstart adding new vertices carefully, one after another, just at those points where I want a line to be drawn. I will add them just outside the original “structural” vertices of the model, so the lines are not cut off by the faces of the mesh.
Another important aspect to this is that I am not connecting these “drawing vectors” in the model in any way. They are going to be used by the script to draw this object, but they should not be used to form faces. Rather they will be “floating” just above the surface of the model.
Also, since you do have a solid, black object to work with, you can also bring some of the vectors inside of that object. These inside lines will not be drawn, but this can be used as a way to re-position the line without having to create a complicated script that stops the line from being drawn between certain vectors. Of course, that would be another potential way to handle doing this.
Using Line Draw (Lite-C Language)
So the main tool we will use to render our 3D scenes is called a line-draw command. What I am doing is taking each game object, and for each frame, calling a script that draws all the lines that render the object. First, for each model, I will need to keep track of the number of the vertices used for rendering. So, say my base model uses 30 vertices for all the solid faces. Vertex number 31 will be the first “floating” vertex used for drawing. In my script for that object, I will use that number, and send it alongto the drawing script, along with other important things like color and alpha.
The drawing script takes the information sent by the object, and uses it to render each line with a line-draw command. So it creates a while loop. In 3D Gamestudio, which uses the Lite-c language, loops can work one of two ways. If you put a wait(1); command at the end of the loop, it will run through the loop once for each frame. This is useful in most cases, because you don't want the game to get caught in the loop, thereby freezing the game. However, when you know the loop will be running a finite number of times, it is also acceptable to leave out the wait(1); command. This will cause the script to run through each iteration of the loop without waiting until the next frame, and this is just what we will do here. Depending on your game engine and/or scripting language, this may be handled differently, so you will need to look into that.

Now in my script, it looks at the first vector I want to draw, and starts there. Then, it increments to the next vector, and draws a line between the first and second. Then, it draws a line between the second andthird, and so on until it reaches the last vector. Then, when there are no more vectors to draw, the loop ends and it moves on to the next part of the script.Here is a breakdown on how the script works. I'm using the same lines as those in the code shown above to describe what it's actually doing. With this, you may be able to convert this script into the language of your choice.
769 Declaration of the functions and its parameters,
    which include the three RGB colors it will be drawn with,
    its alpha (transparency) and the number of the starting vector.
    This function will be called by the game object being drawn once per frame,
    and it will look likethis "draw_me(0,0,255,100,31);"
    In this example it will draw a red game object with no transparency,
    starting from the 31st vector of the model.
771 Declaring a Vector (set of three variables x,y,z) called line_pos
772 Declaring a Variable called line_x and initializing it to the start_vec position
773 Declaring a Variable called vert_num which is assigned "ent_status(my,1)"
    which returns the total number of vertices in the given model.
775 Starting a while loop, which will continue until the last vertex (vert_num) is reached
777 Assigns the position (x,y,z) of the current vertex to the Vector line_pos
779 if this is the very first line being drawn...
781 draw the line but do not assign any color to it.
    This will position the line at the first vertex,
    but will prevent a line from being drawn between it and the last object that was drawn.
    This is a particular feature of the game engine being used,
    and may or may not be necessary in other engines.
783 if this is the last vertex in the mesh...
785 It assigns the position of line_pos back to the first drawn vertex.
    This is another thing particular to the way I designed my meshes.
    I tried to add the last vertex right over the very first one,
    so I would have a sort of closed mesh. There are other ways to approach this.
    And you may want to allow for open meshes, so this would not be a necessary step.
788 else...
790 Draw the line from the end of the last line drawn to the current vertex position
793 Increment to the next vertex position
796 Reset the currently selected vertex position.
    I believe this step is unnecessary, and I'm not exactly sure why I added it to my script.
    However, since the script works right now, I will not worry about fixing/changing it :)
Using GL Lines (Unity C#)
I have taken some time to see about how this can be accomplished in C#, which is the default language in Unity, a more popular game engine than 3D Gamestudio. It turns out that it is not that different in terms of how to do it. Note, there are already some line drawing shaders on the asset store, but from myexperience they will draw lines between all the vertices of a given mesh, and will not allow you to select which vertices are used. The script I am including works the same way as the method described above, so you will need to have a mesh prepared in a similar manner in order to get the results you want. There is more about how to prepare a mesh for use in Unity further along.
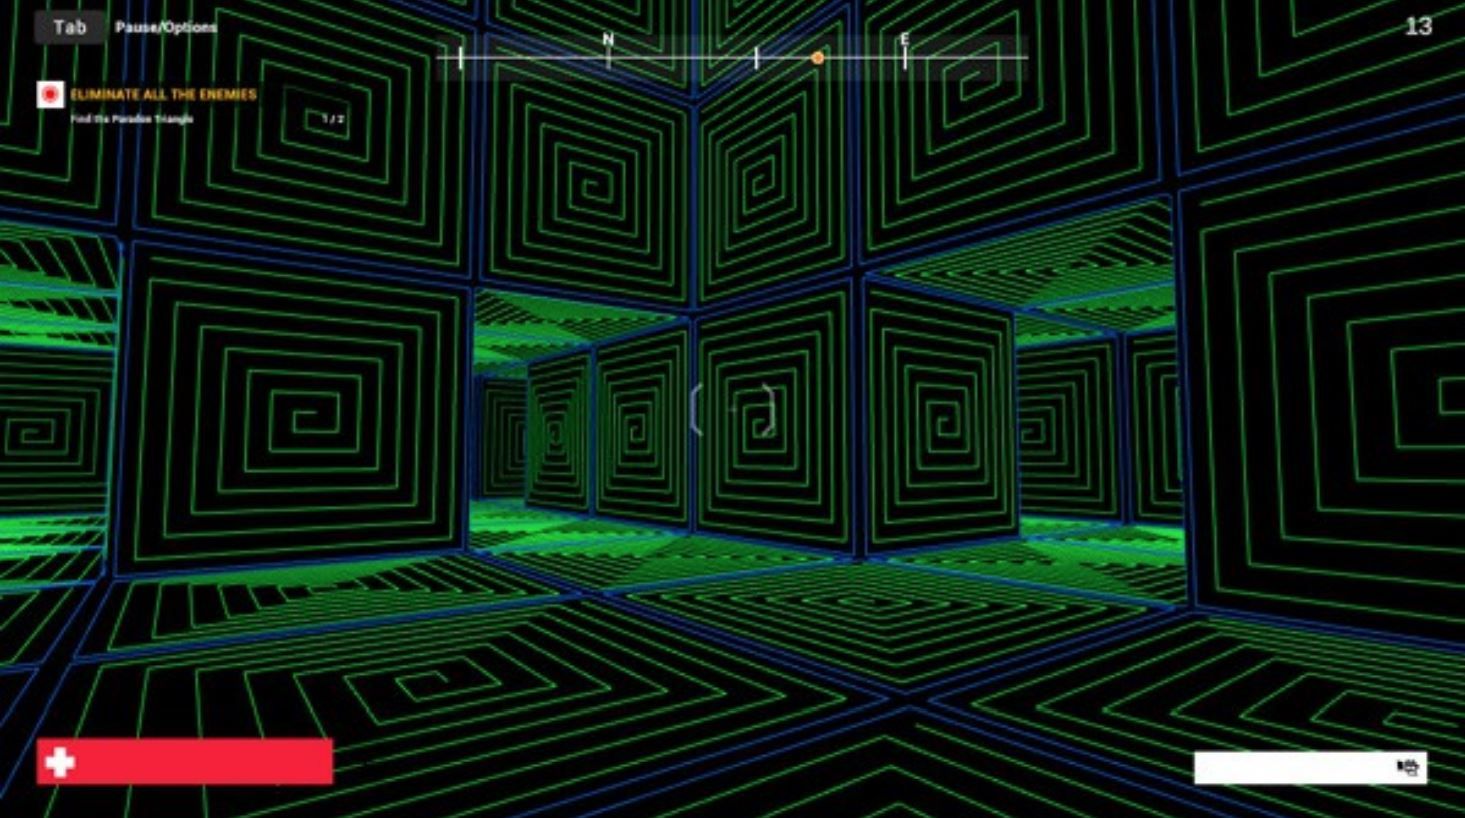
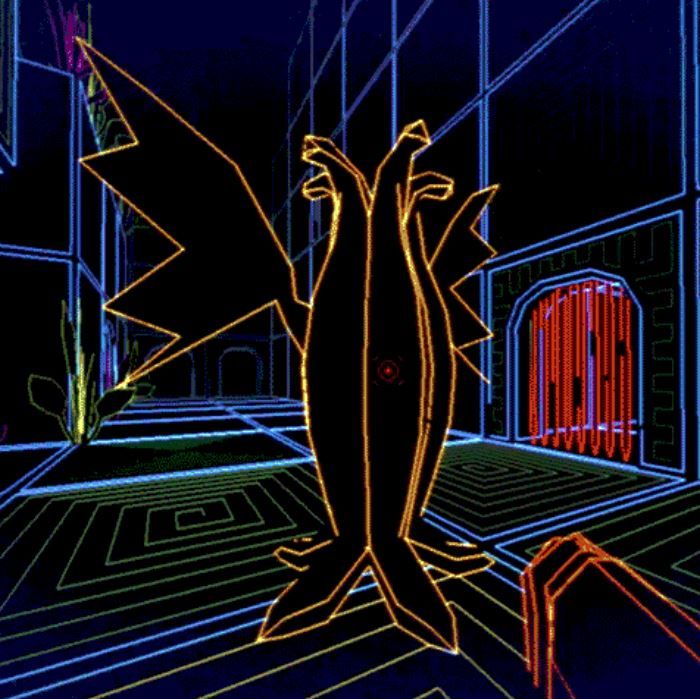
Above you can see that I used the FPS shooter tutorial game in Unity to test out my script. Also, I should give credit to the folks who made the Mesh Wireframe Renderer Asset on the Unity Asset Store.
Here is the script I created based on that script in order to get this to work...
using System.Collections.Generic;
using UnityEngine;
[RequireComponent(typeof (MeshFilter))]
public class Vectorlines: MonoBehaviour {
   //this method allows for two separate colors to be drawn on one model
   //since different models may have different vertex numbers, I made these public so they
   //can be assigned in the editor
   public int drawStart; //Stores the first vertex to be drawn in the first color
   public int drawStop; //stores the last vertex to be drawn in the first color
   public int drawStart2; //Stores the first vertex to be drawn in the second color
   public int drawStop2; //stores the last vertex to be drawn in the second color
   private int _drawQueue = 0;
   private string s = "";
   //This method uses materials to choose the colors
   //assign a color in the editor to each of these slots
   //the names are arbitrary, they both do the same thing,
   //but one will be used for the first set of vertices, and the other for the second
   public Material MeshMaterial;
   public Material WireMaterial;
   public Vector3[] renderQueue;
   private int myVertices;
   Renderer m_Renderer;
   MeshFilter meshFilter;
   Mesh mesh;
   //Start will initialize the mesh and determine the locations of each vertex
   void Start() {
      meshFilter = gameObject.GetComponent();
      mesh = meshFilter.mesh;
      m_Renderer = gameObject.GetComponent();
      //CREATE AN ARRAY TO STORE VERTEX INFORMATION
      renderQueue = new Vector3[mesh.vertexCount];
      myVertices = mesh.vertexCount;
      for (var i = 0; i < myVertices; i += 1) {
         renderQueue[i] = mesh.vertices[i];
      }

   }
   void OnRenderObject() {
      if (m_Renderer.isVisible) {
         GL.MultMatrix(transform.localToWorldMatrix);
         //Begin drawing first set of lines
         GL.Begin(GL.LINES);
         MeshMaterial.SetPass(0);
         GL.Color(new Color(0 f, 0 f, 0 f, 1 f));
         _drawQueue = drawStart;
         while (_drawQueue < drawStop) {
            GL.Vertex3(renderQueue[_drawQueue].x, renderQueue[_drawQueue].y, renderQueue[_drawQueue].z);
            GL.Vertex3(renderQueue[_drawQueue + 1].x, renderQueue[_drawQueue + 1].y, renderQueue[_drawQueue + 1].z);
            _drawQueue += 1;

         }
         GL.End(); //begin drawing second set of lines
         GL.Begin(GL.LINES);
         WireMaterial.SetPass(0);
         GL.Color(new Color(0 f, 0 f, 0 f, 1 f));
         _drawQueue = drawStart2;
         while (_drawQueue < drawStop2 - 1) {
            GL.Vertex3(renderQueue[_drawQueue].x, renderQueue[_drawQueue].y, renderQueue[_drawQueue].z);
            GL.Vertex3(renderQueue[_drawQueue + 1].x, renderQueue[_drawQueue + 1].y, renderQueue[_drawQueue + 1].z);
            _drawQueue += 1;
         }
         GL.End();

      }

   }

}
Simply save this script and name it "Vectorlines.cs" and then add it as a component to the game object(s) you want to draw with vector graphics in the editor.
You will need to apply two materials to the material slots, if you want both colors to render. You will also have to assign a starting and stoppingpoint for each of the two sets of lines to be rendered.
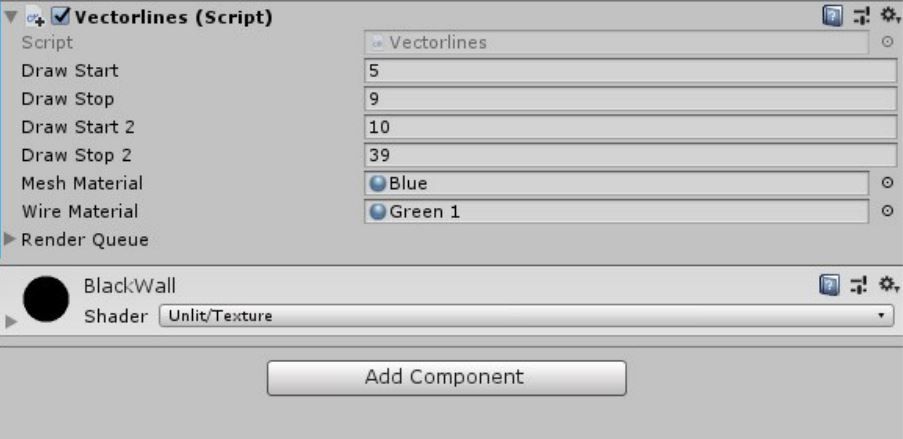
Remember the Draw Start andDraw Stop numbers will depend on the mesh you created, and may change from one mesh to another.For a simpler object you may opt to only use one color. Then you would just leave "Draw Start 2" and "Draw Stop 2" with a value of 0. In that case you could also leave the "Wire Material" slot empty as well.
Important Notes about Unity
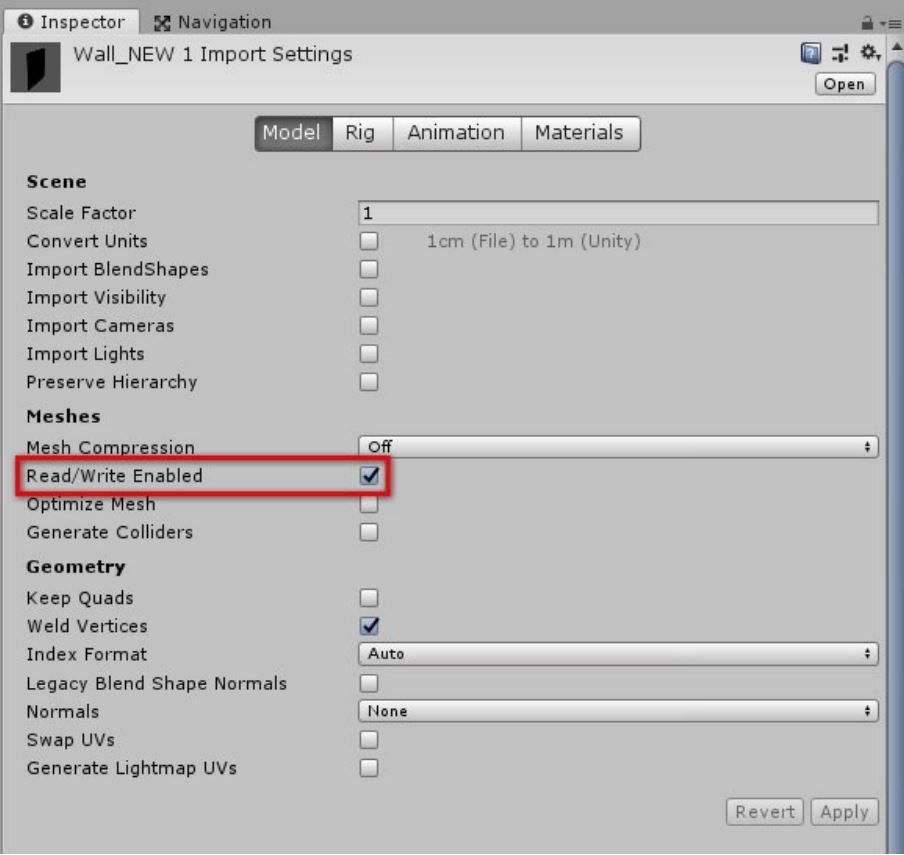
One very important step is to make sure you check the "Read/Write Enabled" box in the inspector once you have imported your model. This may be selected by default, I'm not sure, but make sure it is selected, or the game will not be able to reference the vertices of your mesh once your game has been published to an executable file. It WILL work in the editor without this box checked, but it will NOT WORK after publishing if the box is not checked.
Using Blender
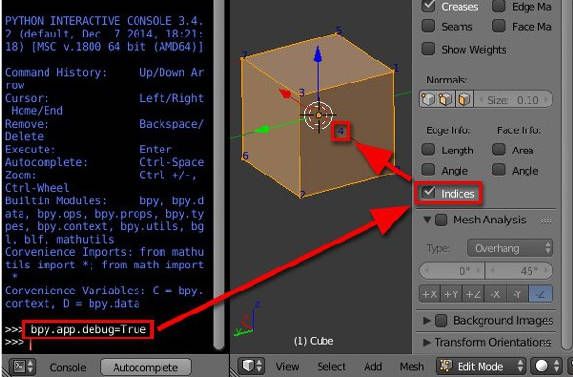
Also, in the example model above I used the 3D editor that comes with 3D Gamestudio. Unity, however, will not be able to use those models. Instead, you can use Blender, which allows you to import models directly into Unity. In fact, Blender is a great 3D tool, and it can do tons of great things, more than enough for any indie game developers.One great thing about Blender, in reference to this tutorial, is that it can display the number of each of the vertices in your mesh. This will help when building your game objects. This option is not there by default though, so you will have to use Debug Mode in order to access it.
•Start Blender in debug mode, or simply go to Python Console (Shift-F4)
•Type "bpy.app.debug = True"
•Go to N-panel > Mesh Display
•A checkbox Indices will now show Indices refers to the number of each vertex.
This number is normally not important to game developers and 3D artists, but it is essential when using this method to draw game objects. If you do not create the object with the vertices made in the proper order, they will not draw correctly. You do not need to activate indices in Blender for this to work, but it helps when you are creating a model, to see the number of the vertex you're working on...
Conclusion
This is not exactly a built in way to generate vector graphics. However, it does work, and it is not muchmore complex than designing any other aspect of game graphics. If carefully placing vectors in order seems time consuming, well, it is, but not much more so than generating UVs and texture maps.
Perhaps, some day, a game engine designer will come up with a more straightforward way to do this. Certainly, there are shaders that can be used to create somewhat similar effects, but they do not quite capture the original simplicity of vector graphics. Until then, I hope maybe some other developers might want to try this out. With modern computers, I think the potential to generate interesting and complex vector games has a huge creative potential that is largely untapped.
As a stylistic approach, vector graphics have the same potential nostalgia as pixel graphics, especially for older gamers. They say limitations are the source of creativity, and by limiting the way we render a game could generate whole new ways of thinking about game graphics.